Install Report Manager (Optional)
TIKTING includes a comprehensive set of dashboards and reporting tools designed to support a wide range of operational and strategic needs. For advanced use cases such as compliance and audit reporting, TIKTING also offers direct database-level access, enabling custom report generation.
To leverage these capabilities, TIKTING integrates seamlessly with Metabase (Community Edition). The following guide outlines the steps to install and configure Metabase within your environment.
Table of contents
- Step 1 - Install Postgres
- Step 2 - Install JDK 21
- Step 3 - Copy Server.jar
- Step 4 - Update web.config
- Step 5 - Add Virtual Directory in IIS
- Step 6 - Set Virtual Directory Path
- Step 7 - Configure the Report Manager in TIKTING Control Panel
- Step 8 - Start the Report Server
- Step 9 - Navigate to Report Admin
- Step 10 - Follow the Setup Wizard
- Congratulations 🎉
Step 1 - Install Postgres
- Download and Run the Postgres Installer from this link
Please select the latest version (Recommended: 17.4)

Step 2 - Install JDK 21
- Download and Run the JDK Installer from this link
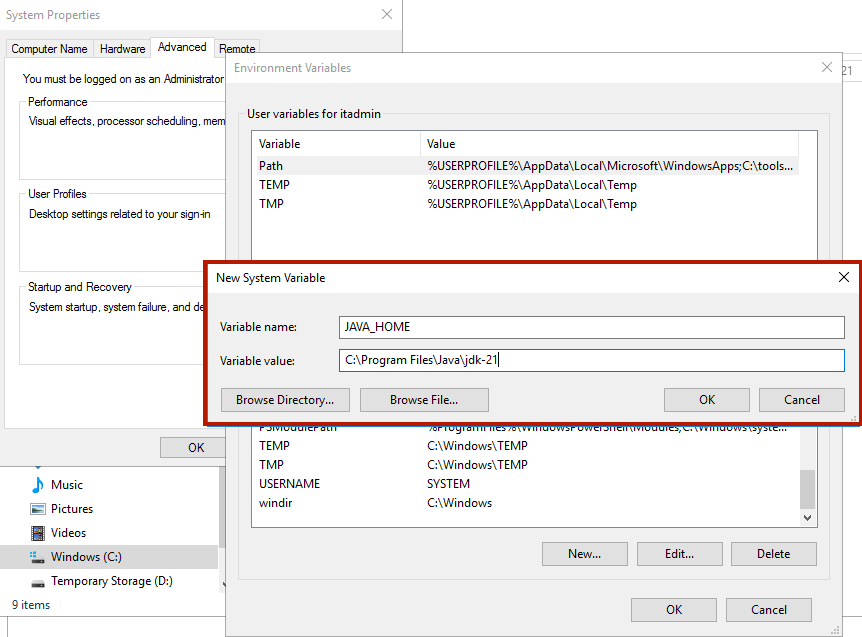
Step 2.1 - Set Java Home Environment Variable
Open System Properties > Advanced > New System Variable > New
Variable Name: JAVA_HOME
Variable Value: C:\Program Files\Java\jdk-21
- Add Java Home Variable
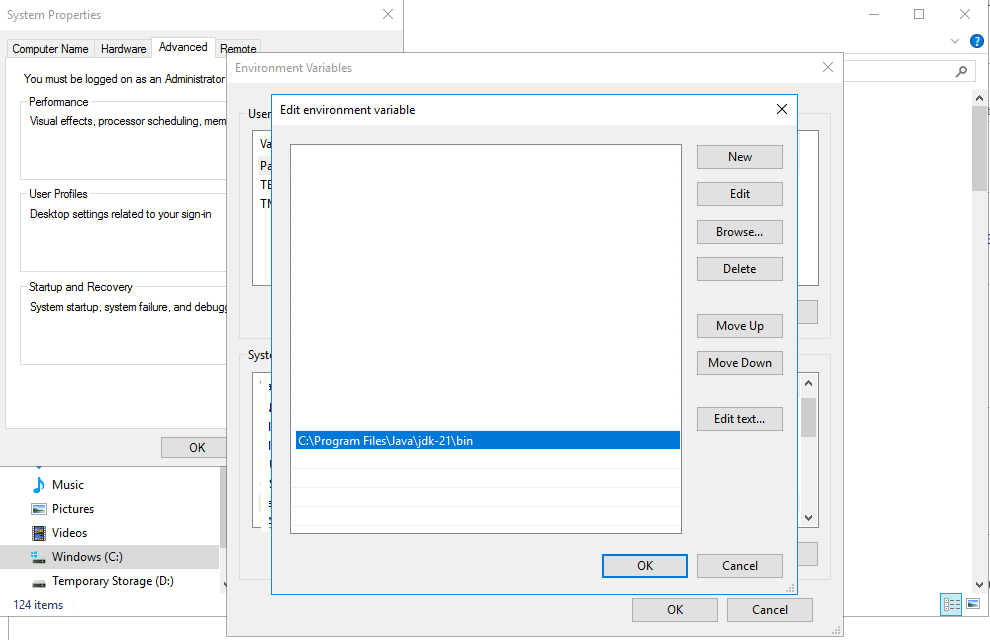
Step 2.2 - Set Java Path
- Find and update - path - variable to
C:\Program Files\Java\jdk-21\bin
Step 3 - Copy Server.jar
- Copy Server.jar to your Installated Directory/ReportServer/
Step 4 - Update web.config
- Update the web.config in the Installed Directory/ReportServer/web.config

Step 5 - Add Virtual Directory in IIS
In this step we will add a virtual directory in the IIS Website
- Open IIS Manager from Server Manager > Tools > IIS Manager (from the drop down menu).
- Right Click Configured Domain and select “Add Virtual Directory”

Step 6 - Set Virtual Directory Path
- Set and test the virtual directory path

Step 7 - Configure the Report Manager in TIKTING Control Panel
- Navigate to the Report Server Configuration

- Enter your postgres server configuration

Step 8 - Start the Report Server
- Start the report server and wait approximately one minute until the server status indicates “Server is running.”

Confirm the server is starting as the image below.

Step 9 - Navigate to Report Admin
- Navigate to the report admin

Step 10 - Follow the Setup Wizard
- Follow the on-screen instructions to complete the setup wizard. During this process, you will be prompted to create an administrator account.


Make sure to securely note the credentials used to create the administrator account. It is important to keep these credentials safe for future access and management.


- Sign into Metabase using the credentials you provided during administrator account creation.

- Add your Database

- Connect your Database
Locate the appsettings.json file in the root directory of the installation. This file contains the database credentials required connecting your database.

Congratulations 🎉
You have successfully installed and configured the reporting server.
Let’s explore how to create custom reports using the report server.